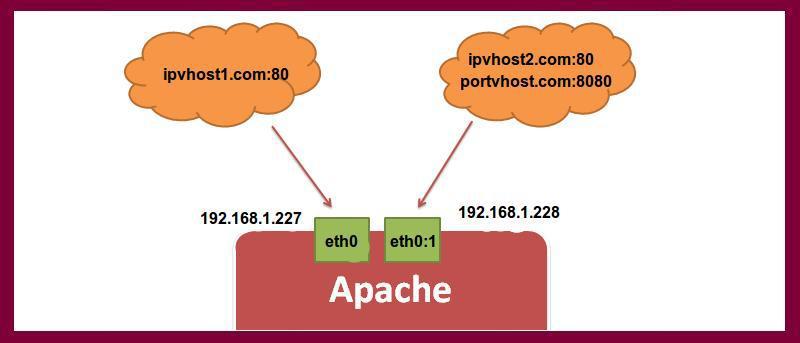
Virtual hosting is a method for hosting multiple websites on a single server. There are two types of virtual hosting: Name based virtual hosting and IP-based virtual hosting. IP-based virtual hosting is a technique to apply different directives based on the IP address and port a request is received on. You can assign a separate IP for each domain on a single server using IP-based virtual hosting. Mostly this is used to host different websites on different ports or IPs.
Here we are going to host “www.ipvhost1.com” on IP “192.168.1.227”, “www.ipvhost2.com” on IP “192.168.1.228” and “www.portvhost.com” on IP “192.168.1.228” with Port 8080.
To setup IP-based virtual hosting, you must have more than one IP address assigned to your Linux machine. Setting up multiple IP addresses on a single network interface is called IP aliasing. IP aliasing is very useful if you have only one network interface card.
To do this, you need to edit the “/etc/network/interfaces” file.
sudo nano /etc/network/interfacesAdd the following lines:
auto eth0iface eth0 inet staticaddress 192.168.1.227netmask 255.255.255.0gateway 192.168.1.1dns-nameservers 8.8.8.8 auto eth0:1iface eth0:1 inet staticaddress 192.168.1.228netmask 255.255.255.0Save and close the file, then restart network service to make these changes take effect.
sudo/etc/init.d/networking restartsudo ifup eth0:1By default, Apache listen on port 80. For port-based virtual hosting, you need to tell Apache to listen to IP “192.168.1.227” and “192.168.1.228” on port 80 and IP “192.168.1.228” on port 8080.
To setup multiple ports, you need to edit “/etc/apache2/ports.conf”.
sudo nano /etc/apache2/ports.confAdd the following line:
Listen 192.168.1.227:80Listen 192.168.1.228:80Listen 192.168.1.228:8080Save and close the file, then restart Apache to make these changes take effect.
sudo /etc/init.d/apache2 restartFirst,you need to make a directory structure which will hold the web pages. This directory is known as DocumentRoot for the domain.
Create three directories for websites “www.ipvhost1.com”, “www.ipvhost2.com” and “www.portvhost.com” under Apache default DocumentRoot directory.
sudo mkdir -p /var/www/html/www.ipvhost1.comsudo mkdir -p /var/www/html/www.ipvhost2.comsudo mkdir -p /var/www/html/www.portvhost.comCreate an “index.html” file for each website that identifies specific IPs and Port.
Create an index.html file for “www.ipvhost1.com” virtual host.
sudo nano/var/www/html/www.ipvhost1.com/index.htmlAdd the following content.
www.ipvhost1.comThe ipvhost1.com ip virtual host is working!
Save and close the file when you are finished.
Create an “index.html” file for “www.ipvhost2.com” virtual host.
sudo nano/var/www/html/www.ipvhost2.com/index.htmlAdd the following content.
www.ipvhost2.com
The ipvhost2.com ip virtual host is working!
Save and close the file when you are finished.
Create an “index.html” file for “www.portvhost.com” virtual host.
sudo nano/var/www/html/www.portvhost.com/index.htmlAdd the following content.
www.portvhost.comThe portvhost.com port virtual host is working!
Save and close the file when you are finished.
By default, Apache service runs as a “www-data” user in Ubuntu. You must change the ownership of these three virtual directories to “www-data” so that Apache can read and write data.
To do this, run:
sudo chown -R www-data:www-data /var/www/html/www.ipvhost1.comsudo chown -R www-data:www-data /var/www/html/www.ipvhost2.comsudo chown -R www-data:www-data /var/www/html/www.portvhost.comAlso, you need to make sure the Apache web root (/var/www/html) directory is readable so that everyone can read files from it.
sudo chmod -R 755 /var/www/htmlBy default, Apache comes with a default virtual host file called “000-default.conf”. You need to disable this virtual host file first.
To do this, run the following command.
sudo a2dissite 000-default.confThe next step is to create a virtual host configuration file for each website. The name of each configuration file must end with “.conf”.
Create a virtual host file for website “www.ipvhost1.com”.
sudo nano /etc/apache2/sites-available/www.ipvhost1.com.confAdd the following content.
<VirtualHost 192.168.1.227:80> ServerAdmin admin@ipvhost1.comServerNamewww.ipvhost1.comDocumentRoot /var/www/html/www.ipvhost1.com ErrorLog ${APACHE_LOG_DIR}/www.ipvhost1.com_error.logCustomLog ${APACHE_LOG_DIR}/www.ipvhost1.com_access.log combined VirtualHost>Save and close the file.
Create a virtual host file for website “www.ipvhost2.com”.
sudo nano /etc/apache2/sites-available/www.ipvhost2.com.confAdd the following content.
<VirtualHost 192.168.1.228:80> ServerAdmin admin@ipvhost2.comServerNamewww.ipvhost2.comDocumentRoot /var/www/html/www.ipvhost2.com ErrorLog ${APACHE_LOG_DIR}/www.ipvhost2.com_error.logCustomLog ${APACHE_LOG_DIR}/www.ipvhost2.com_access.log combined VirtualHost>Save and close the file.
Create a virtual host file for website “www.portvhost.com”.
sudo nano /etc/apache2/sites-available/www.portvhost.com.confAdd the following content.
<VirtualHost 192.168.1.228:8080> ServerAdmin admin@portvhost.comServerNamewww.portvhost.comDocumentRoot /var/www/html/www.portvhost.com ErrorLog ${APACHE_LOG_DIR}/www.portvhost.com_error.logCustomLog ${APACHE_LOG_DIR}/www.portvhost.com_access.log combined VirtualHost>Save and close the file.
After creating the virtual host files, you need to enable the virtual hosts.
You can do this by running.
sudo a2ensite www.ipvhost1.com.confsudo a2ensite www.ipvhost2.com.confsudo a2ensite www.portvhost.com.confFinally, restart the Apache service.
sudo /etc/init.d/apache2 restartNow, it’s time to test the IP Virtualhost. On a computer, open your web browser and navigate to URLs “http://192.168.1.227:80” and “http://192.168.1.228:80”. You should see sample demo pages for IP-based virtual hosting that look like this:
Similarly, to test Port Virtualhost, open your web browser and navigate to URL “http://192.168.1.228:8080”. You should see a sample demo page for Port-based virtual hosting that looks like this:
In this post, I showed the step-by-step procedure to create and enable an IP-based and port-based virtual host on Apache web server. You can easily set up many domains on the same server.
Is this article useful?
Hitesh JethvaOver 5 years of experience as IT system administrator for IT company in India. My skills include a deep knowledge of Rehat/Centos, Ubuntu nginx and Apache, Mysql, Subversion, Linux, Ubuntu, web hosting, web server, squied proxy, NFS, FTP, DNS, Samba, ldap, Openvpn, Haproxy, Amazon web services, WHMCS, Openstack Cloud, Postfix Mail Server, Security etc.
PREV: Understanding Active Directory in Windows Server 2012 R2 ...
NEXT: Final Fantasy XIV: A Realm Reborn Servers, Transfers and More ...